Setup Outbound Template Wizard
Call lists provide the details the agent needs to make the call, and any supplementary information you may have about the person being called.
Before you can populate a call list, you need to create an Import Template/Outbound Template. The template maps the data to both the outbound Agent Desktop screen and the script.
The system assumes that you are obtaining data from the same source every time, and are using the same script every time, therefore it will be in the same format and will map to the same script fields. The Import Template also facilitates scheduled imports from external data sources.
Add/Edit Import Template
Click the Add Import Template button at the top left of the main screen. The Setup Outbound Template wizard will launch:
Step 1 - Choose Data Source and Name Template
In this instance, we are importing from an Excel Spreadsheet and so have chosen OLEDB as the data source type.
Give your Template a name. You will be able to edit your template later if required. Click Next.
Step 2 - Connect to the Data Source
Depending on the data source type you have specified in step 1, the instructions will differ slightly. If using an Excel file as shown here, you must browse to locate the file on your PC or Network, then upload the file to CallScripter:
Click Test Connection. If everything is OK, Click Next.
Step 3 - Specify Text Identifier characters.
This step removes any single quotes (apostrophes) used as text identifiers in older databases, with double quotes. It is unlikely that you will have to change this.
Click Next
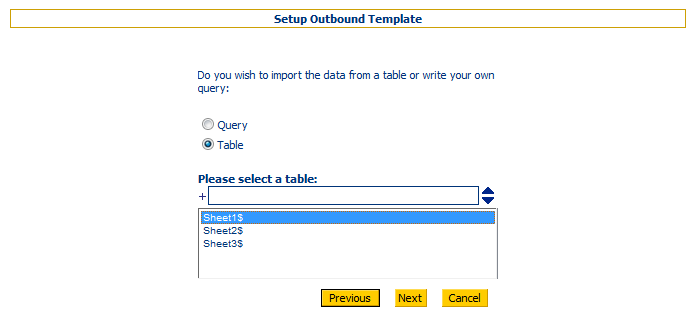
Step 4 - Specify the Query or Table to use from your Data Source
In this case, we are importing the whole "Table" which is a sheet in an Excel workbook.
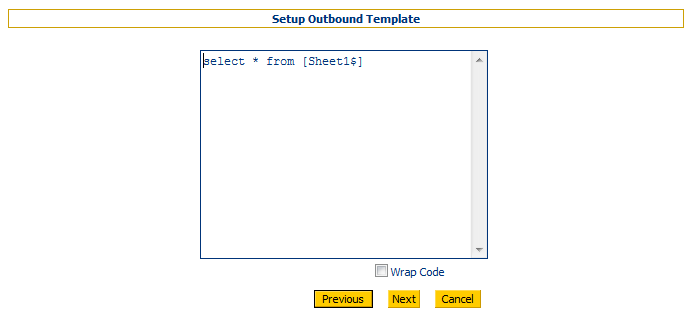
Step 4a - Enter Query if appropriate
If using a true database, you will be able to choose an entire table from the database as shown above, or enter the query into the next step of the wizard as shown here:
Step 5 - Filter your query or table data if appropriate
The headings shown are the field names in your data source, or in this case, Excel column headings.
Step 6 - Map your data to the outbound calling screen
The outbound calling screen is the screen that is shown in the Agent Desktop when an Agent is first presented with a record to dial. These mapped fields are also the primary fields listed when viewing or Managing Campaign Records in the Outbound Manager.
Note that there is only one "Name" column If your data source has two columns, first name and last name, you should concatenate these into a single column as this is what will be presented to the Agent prior to dialling. You only need to map one telephone number.
Whilst not necessary, it is advisable to include a Unique reference in your data source. This makes it easier to edit or update the call list later if required. If you do not have a Unique, or Primary Key column, you can check the Auto Correct Reference box and CallScripter will generate one for you. The reference is also used to identify duplicates. If you attempt to import records with the same unique reference number into the same campaign.
Step 7 - Additional Import Options

-
Add preceding zeroes to telephone numbers - some spreadsheet software will strip leading zeroes from telephone numbers. CallScripter will add them back on if required.
-
Remove any non numeric characters from telephone numbers - cleans brackets around dialling codes, spaces in telephone numbers, etc, from telephone number fields.
-
Remove international prefixes = if dialling international numbers, you should not use this feature, but make sure that the full telephone number for each record is imported. If dialling numbers all in the same country, you may find that some of your numbers include (+44), etc where it is not needed. Check this option to remove the prefix and replace it with a zero. e.g., (+44) 1473 ###### would become 01473 ######.
-
Move telephone numbers left if blank. In step 6, above, we mapped up to three telephone numbers to the telephone number fields shown in the outbound calling screen. If you have three telephone numbers, e.g., home, work, mobile, and you map these to Telephone columns 1, 2 and 3, if an entry has no "home" number, column 1 will be blank. Moving the numbers from right to left ensures that the first column always displays a telephone number.
-
De duplicate telephone numbers - CallScripter will not import any records where the telephone number is already present in the current call list. You can import the records again into a different call list or campaign.
-
DNC Contacts - CallScripter will not import any records where the record already exists in the DNC table. This can be set at database level to be by campaign, by call list or system wide. See also
Populating the DNC Table from a Script Run -
Email address for exceptions- The import process will generate a spreadsheet of exceptions, i.e., where the telephone numbers were duplicates, or where the record was already in the system marked as DNC.
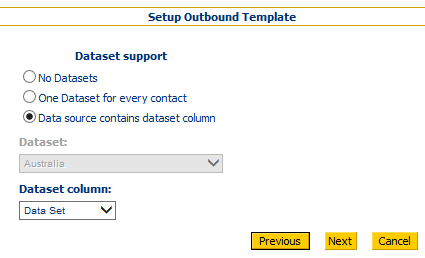
Step 8 - Assign Data Set(s) - Optional
Data set support enables you to assign dialling rules and local time zones to sets of data. Here you can apply a single data set to each contact in the source you are importing using the current template, or specify a column in your
data source that corresponds to existing data sets. If using the latter, then where the data set does not already exist, it will be created on import. Note that data sets are case sensitive. For more information, see
Manage Data Sets.
Note: Feature only available in version 4.5.17 and later.
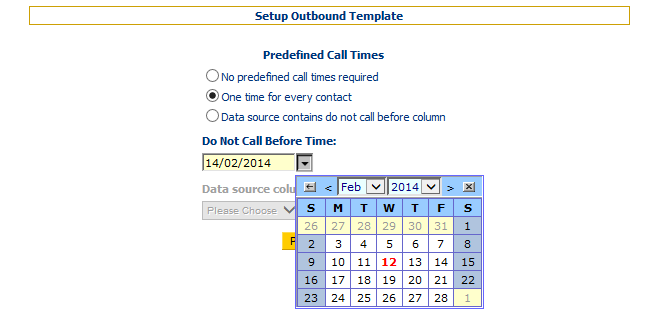
Step 9 - Predefined Call Times
Three options are available:
1) No predefined call times required:
No call time is set. The call list is activated/deactivated in the usual manner (i.e making the call list live etc)
2) One time for every contact:
Select a date from the calendar and each record will not be available for calling before this date. After this date the records will be available for calling (effectively this acts as a "buffer" – even if the call list is live, and agents allocated, the call list will not serve any records).
The call list will still need to be made active and agents assigned for the call list to work.
3) Data source contains do not call before column:
The spreadsheet or SQL table contains a valid date for each record. This date column is selected from the "data source column" drop down list, allowing groups of records to have different dates set.
As per option 2 above these dates are the dates at which the record is considered part of the campaign. At the point the date/time becomes effective the record is then recognised as being a record that can be distributed to an agent. This date is independant of when it will actually be called or any priority that may have been set.
An example of use would be to remind of overdue payments. All call list data could be loaded on a Monday but the person isn't due to be contacted about payment until the Thursday.
The format of the date should correspond to the format taken from the default language of the CallScripter user defined in the CallScripter database.
Referring to this format will define the format the date is expected in - either dd/MM/yyyy HH:mm:ss or MM/dd/yyyy HH:mm:ss.
In an excel file the dates in the column should correspond to this format for a successful upload. They may be formatted as Text or as date/time or date as long as the date shown in the formula bar corresponds to the format appropriate for the CallScripter user in the database e.g. a valid date would be a Text format: 30/11/2013 or 30/11/2013 00:00:00 or a Date format of Type 14 March 2001 or 14/03/2001. Any invalid rows are recorded and can be downloaded at the end of the call list import process.
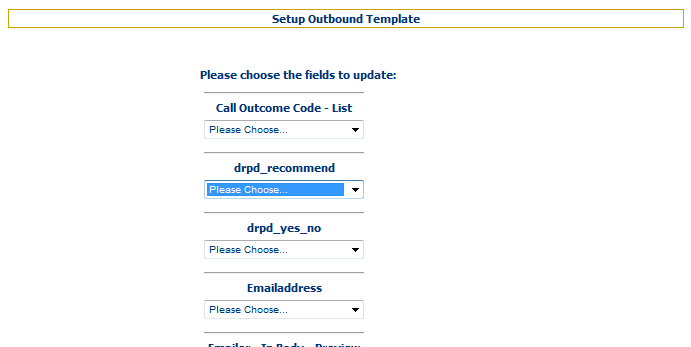
Step 10 - Map data source fields to script fields
In order that your script can be pre-populated with data, you can map your script fields (bold) to the data source fields (dropdowns). Note that ALL script fields will show but you would not want to map to those that the Agent is to complete during the call.
Step 11 - Import Campaign Data
Click on "Import Call List" to complete the process.
You will then see the following screen detailing the imported records. See Managing Call Lists for more information.